Big Bore cylinder for Kawasaki Eliminator 125
 |
| 125cc versus 175cc |
Need for more power and speed? I am the supplyer of this Big bore set.
Here you will hopefully find answers to your questions about the Big Bore set.
I have during the past 15 years (since 2001) worked with the Kawasaki Eliminator 125, and overhauled many engines of this model. I have found sources in Asia for cheap parts for these bikes, and one very interesting development I have made, is how to transform the BN125 engine into a 175 engine.
The engines themselves are quite identical, with only some minor differences.
The cylinder head of the 125cc is of course smaller in the cumbustion chamber (55mm diameter) as is also the diameter of the cylinder and piston for the 125cc version. The combustion chamber of the 125 can be machined out to obtain a diameter of 65mm, just like the diameter of the BN175 piston and cylinder, and head obviously has.
It is possible to put the 175 (174cc) cylinder block straight on to the BN125cc engine. It is a straight fit. The bores are different, but the stroke is the same, and so are the physical dimensions.
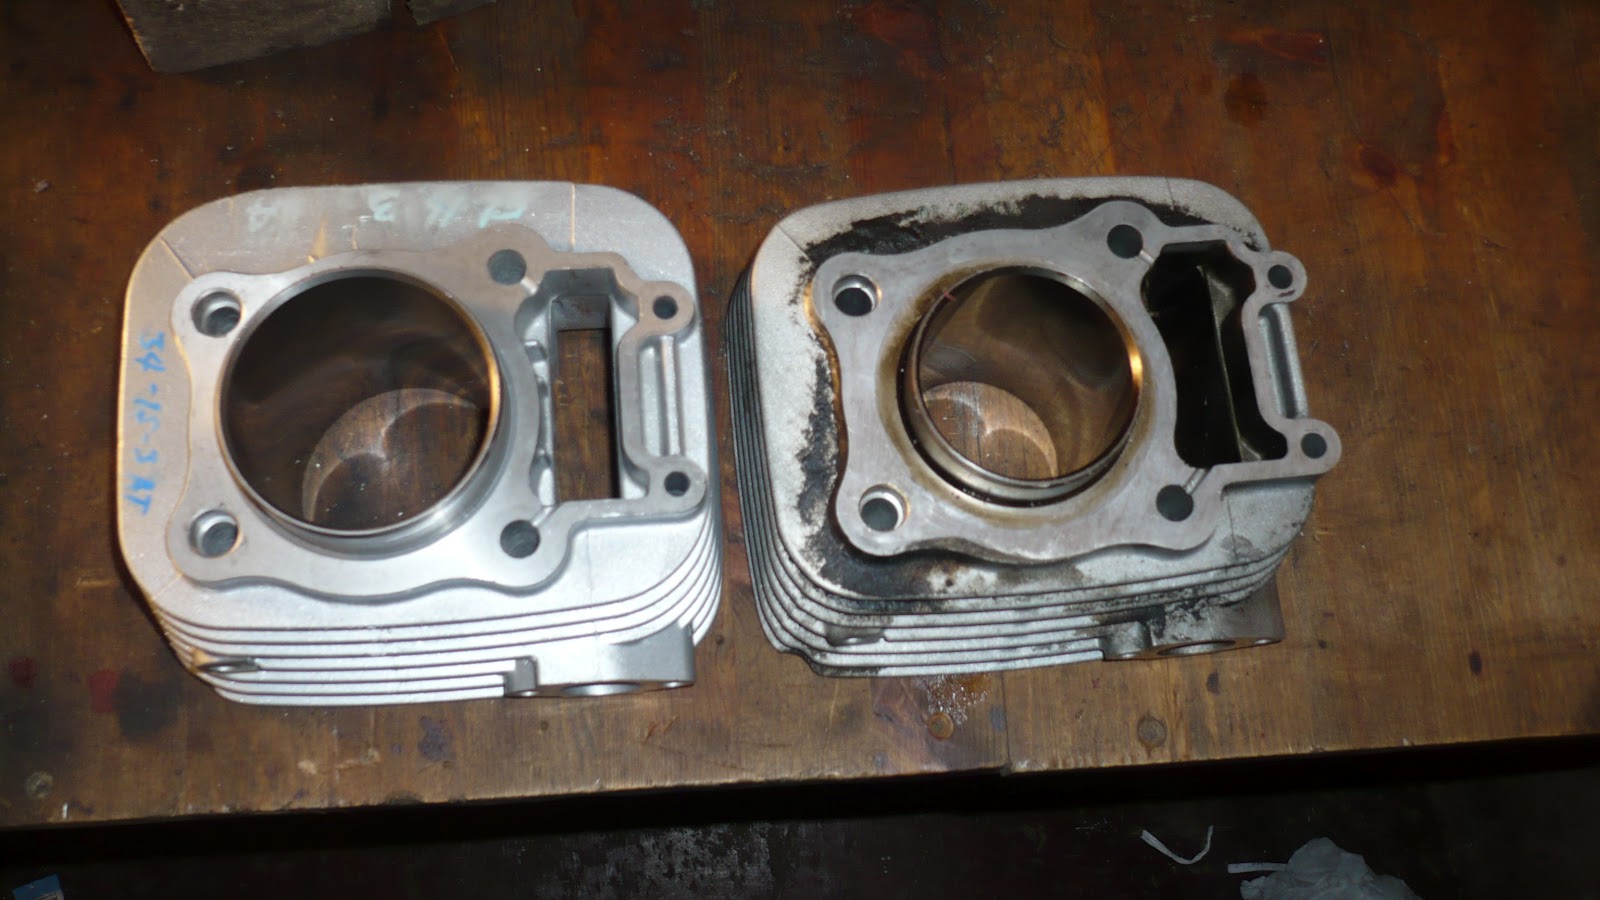
 |
| BN175 cylinder to the left, BN125 cylinder to the right |
 |
| BN175 cylinder and piston |

The problem is the size of the piston pins and the hole in the connection rod:
*15mm diameter in the BN125 engine
*16mm diameter in the BN175 engine
One way to overcome this challenge - the best, most durable but also most expensive - is to split the engine of the BN125 and either change the whole crank shaft assembly or bring it to a machine specialist and have the con rod exchanged with that of the BN175. If your engine has internal damages anyway,this is the way to go.
If you can afford it, the best and safest result will always be to change the con rod or the crank shaft for worry-less use of the big cylinder.
 |
| Crankshaft assembly BN175 |
 |
| Con rod overhaul set BN175 |
I have, however, developped a system that overcomes this challenge of piston pin differences, if the goal is to put a 175cc cylinder on a 125cc engine without too much hassle and time consuming labour. The set consists of a 15mm piston pin, that has been cut to fit into the bushings, and that there is left room enough to put the 2 circlips on either side of it.
The reducing bushings are made of steel, and have an inside of 15mm diameter, and an outside diameter of 16mm, which means it will be able to be used in the BN175 piston.
Now the cylinder head remains an issue. I have actually successfully installed the BN175 cylinder together with a BN125 head. The machine worked great, but from time to time there would be some ping sounds from the engine. It turned out that on idle rpm the piston would sometimes slightly hit the head. I had driven the engine for a few kms, but decided to open it and check. There were no damages of any significance in neither the piston nor in the cylinder head, but I could see some minor scratches. Therefore I took the cylinder head to a machine workshop, and the mechaninc opened the cumbustion chamber up to 65mm in a metal lathe. After that, no more worries.
 |
| BN175 head to the left, BN125 head to the right |
I guess a cheap and fast way of resolving the issue, would be to put 2 cylinder base gaskets under the cylinder block, so the block would be raised just a few mm and thus avoiding the contact between the piston top and the cylinder head.

Yet another way to overcome the problem, may be to grind down the outer edge of the top of the piston.
In these 3 photos one can see a bn175 piston that has been modified by lowering the outer edge of the piston top, so it might fit into the bn125 cylinder head's cumbustion chamber.
(I have not yet tried to fit this piston on an engine though, so I have not reports about how it works.
WARNING: I do not guarantee the function of this solution with reducing bushings etc, as it is not a standard procedure. I only tried it on for a short while on a bike some years ago, and for the few days I had it, it worked perfectly. I have also sold this solution to other people, and I had very good feedbacks from one customer in Portugal, and another one in Italy. The Portuguese customer have used this system for a couple of years, and rode the bike more than 30 000 kms with my big bore set and reducing kit solution.
CARBURATOR adjustments.
The bikes I have worked with in Norway where I did this big bore cylinder thing, has turned out to work well with the original main jet in the carburetor. Main jet size of these bikes in my country is #105. No adjustments have been necessary. But on my last 2 projects I installed a #115 and the a #118 jet, and it sure added power to the bike. But this may vary with climate and different models, so I would recommedn to try out a slightly larger jet. The US models have size #125, so I suppose fitting a #135-140 jet may be a good solution for those bikes. However, if the main jet is too large, the engine will not work properly!
If you have a large main jet, you might try to put on a power filter, or even make some holes in the air filter boks to increase the air flow, but this may require some testing and failing before you find the perfect balance.
SPROCKETS
The BN125 has normally a 15T front sprocket and a 46T rear sprocket. This is very bad for the engine if you run the bike at high speeds. I would recommend anybody to try out with at least a 16T front sprocket, even if your engine is of stock version.
If you put the big bore cylinder, you should definately put the 42T rear sprocket, at least! You could even put a 41T rear sprocket with no hesitations.These days I can not find the 42T, only the 41T.
WHERE CAN I BUY THIS BIG BORE CYLINDER KIT?
I am the only one, as far as I know, that have this stuff for sale.
It is very hard to find those cylinders now, and they are quite costly, so be prepared to pay 350 usd to get a set from me. The set will include cylinder, piston, reducing set, 1 front sprocket 16T and gaskets for the cylinder and head: 2 cylinder base gaskets and of course a BN175 head gasket.
 |
| This
is the gasket set for the top end, that comes in the package. Here with
the front sprocket 16T, the reducing bushings on a 15mm pin bolt and
the extra cylinder base gasket that helps lift the 125cc head clear off
the piston |
Shipping worldwide with air mail is included also in this price.
You can add to the order:
Sprocket rear 41T
Con rod overhaul kit
Valves
Camshaft
Rocker arms
Cylinder head bn175
Full engine gasket set with O-rings
 |
| Full engine gasket set with O-rings is an option you should go for. Add 10 usd more to your order, and it will come instead of the small top end gasket set |
and many other items for your bike. However, this is NOT a serious, big business, just a hobby for me, so I may not have all parts available at all times.
Also, I may at times not be able to send the products quickly, as I often travel.
To get in touch with me, send an email to
j o h n _ l o d e @ y a h o o . n o
(just remove the space between the letters, and you should be able to send the email to me.)
Note: I have not capacity to answer many emails about this issue, so please read the instructions here and also in my photobucket site, to find answers.
http://s1134.photobucket.com/albums/m607/eliminator125/Big%20bore%20Cylinder%20kit/